
So, after months and months of work, lots learned, lots went wrong, lots went right and vast amounts of coffee was consumed. Here is my final major project for the NCCA. A major cheese fest which pays tribute to the 1970's/80's horror films of that time. Hope you like it, it was fun to do.
I'm particularly proud of my amazing acting skills lol. I never realised how hard it is to do accents. Now, I'm off to get ready for my wedding which takes place in a few hours. Can't wait. Talk about a busy month!
I will be returning to the NCCA in Bournemouth this October for the third, and final, year of my Computer Animation Arts degree course.
With this in mind I have been mulling over a few ideas in my head as to what I want to produce for my final year project. One of the ideas I have will require some CG fire elements. This is something I have never really tackled before and will be a challenge.
With this said I made my first attempt last night at producing CG fire using the Fluid Dynamics properties within Maya. I'm pretty pleased with it as a very rough first try. I shall work on this along with my ideas for the project soon.
This is what I managed to come up with last night after hitting every button in Maya and shouting at the screen a lot:
UPDATE:
This is a rough concept painting I made today to give myself more of an idea as to which direction my project may take. Still early days on this idea:

Photoshop and Maya were used to create this image.
UPDATE:
My final year project at Uni will (for the most part) be using Maya, video footage and Nuke. However, some shots will require the use of special FX make up. Never having done this before I thought I would give it a go. This was my first attempt.
I recently acquired a new green screen kit to help me with my compositing studies. I wanted to try this out last week using natural daylight but unfortunately the weather was too bad. I decided that I couldn't wait any more to play with it so I cleared everything out of the kitchen and set it up. This is what I came up with.
This next video was created on the same day by comping and green screening different videos over each other:
I took the green screen kit to Uni hoping that the weather would be good. Guess what? It wasn't! So, with the help of 3 of my class mates I set it up in a really cramped computer lab, set up my lights and filmed my 3 class mates a couple of times and comped them together using the previous backplate. Again, just a test at this stage.
This is the 'Main Set' I am currently working on for my 3rd year project. The main actor will be comped on to this model (made in Maya) using Nuke. Still early days with this model, here I have blocked in the main areas:

Made in Maya (click for larger view)

Made in Maya (click for larger view)
UPDATE:
What better way for the family to bond than to have my daughter sit for my whilst I have another bash at creating some home made Zombie makeup. The image on the left is the original makeup I created and applied to my daughters face this afternoon. The blood needs to be a lot darker and thicker, and I need to work on blending the skin tones more, but I think it is getting there.
The image on the right is a digitally extended version I created using the original photograph and colour correcting, warping and adding a photograph of a set of dentures from the internet.

My latest makeup test/undead concept art
UPDATE:
I took some film of myself and worked on it using Nuke. I wanted to see what kind of 'eye replacement' effect I could come up with digitally. This is my first attempt at this. There are a number of issues including mask sliding, shadows need to be blended properly, the eye roto needs polishing. However, as it is a quick test I think it came out pretty well.
UPDATE:
Testing a 3D projected texture on to a low poly 3D model which is then composited on to a 76 frame tracked image sequence. Still a bit of slipping in the track which I tried to compensate for with hand animation techniques. Getting there (I hope lol!)
UPDATE:
Recently I have been spending quite a bit of my time on the project looking into tracking and SFX. There is also the need to produce geometry for facial replacement too. With this in mind, I fired up Maya and ZBrush yesterday to create a quick concept sculpt of a 'jawless' zombie. I have always loved the SFX work of Greg Nicotero and the 'Dr. Tongue' zombie character seen in the opening scenes of George A. Romero's 1985 movie 'Day of the Dead' has always been something I have wanted to tackle in CG. This is what I came up with yesterday (very rough, but it helps me to see if I think it is working or not):

Base mesh made in Maya. Quickly sculpted in ZBrush

Same base mesh with a lot more sculpting and polypainting in ZBrush
I also did a very rough rig of the concept sculpt and animated a quick 120 frames to show me how it would stretch/turn. By no means a finished sculpt or rig:
UPDATE:
This is my first test at geometry tracking with the aim of creating a full head replacement. There is still a problem with slipping and the roto work is not my best! No proper lighting either in this little test piece:
I have also been looking into a number of ways for 'smoke' creation for the project. I decided to take a look at the new tools for this very thing found in the latest version of Blender. Never having used Blender before I was blown away by what it could do and how quick it could do it. This is my first attempt at creating CG smoke using blender:
UPDATE:
I've been a busy chap this week learning how to get to grips with my new Canon 550D DSLR camera. Really pleased with getting it and I've been like a kid at Christmas annoying my family by snapping away at any given opportunity!
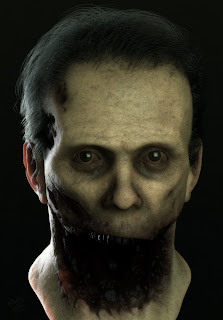
I did manage to make time to work on the 'Jawless Zombie' concept idea a bit more. I sculpted out the details in ZBrush from a base mesh I made in Maya. I then hand painted the textures for the SSS material and rendered him out in Maya. The eyes and teeth are place holder geometry which I will work on some more. This is by no means finished yet (still lots of tweaking and I also want to get to grips with hair too) but I am really pleased with the way it is coming along. 10 minutes per render is worrying me about whether it will be able to be animated. We'll see I guess:


This is a rough animatic showing my proposed shot idea for the project (The little orange square represents the position of the 'hero' of the piece)


My revised storyboard. The shots where you see the train will also have zombies on the platform (I hope that makes sense!)
I have also been looking into a number of ways for 'smoke' creation for the project. I decided to take a look at the new tools for this very thing found in the latest version of Blender. Never having used Blender before I was blown away by what it could do and how quick it could do it. This is my first attempt at creating CG smoke using blender:
UPDATE:
I've been a busy chap this week learning how to get to grips with my new Canon 550D DSLR camera. Really pleased with getting it and I've been like a kid at Christmas annoying my family by snapping away at any given opportunity!
I did manage to make time to work on the 'Jawless Zombie' concept idea a bit more. I sculpted out the details in ZBrush from a base mesh I made in Maya. I then hand painted the textures for the SSS material and rendered him out in Maya. The eyes and teeth are place holder geometry which I will work on some more. This is by no means finished yet (still lots of tweaking and I also want to get to grips with hair too) but I am really pleased with the way it is coming along. 10 minutes per render is worrying me about whether it will be able to be animated. We'll see I guess:

This is a 'Clay Render' with Displacement in Maya (click image for bigger picture)

The model with SSS work in progress materials applied (click image for bigger picture)
UPDATE:
Hello all,
I have been working more on the SSS skin shader and managed to get the renders down to about 10 minutes. As my project only sees this jawless zombie (Zack to his friends) for about 10 seconds I think the 10 minute per frame is ok (hopefully). Anyway, this is a test using Maya hair for the first time. I've also been trying to get to grips with sculpting different poses in ZBrush and using these as blendshapes to animate the brow, upper lip, eyelids, nostrils etc.
A Low res version of my model with no displacement maps etc showing my blend shape tests so far.
A Low res version of my model with no displacement maps etc showing my blend shape tests so far.

Getting to grips with Maya Hair (Not easy, not easy at all!)
I need to practice on my hairdressing skills to get this right.
This is an animation test using the skin shader. No Blendshapes here, just a simple rig with aim constraints for the eyes. Since making this video I have made the irises smaller so as not to get that 'Puss in Boots' bug eye look. See the image above this video to see the new eyes.
UPDATE:
It's been a while since my last post as I have now started back at Uni for my third and final year. Here are a couple of quick updates to my major project.

This is a concept painting for the 'look' of my project (Photoshop)

These are some concept designs I created for the proposed SFX make up elements (Photoshop)
This is a rough animatic showing my proposed shot idea for the project (The little orange square represents the position of the 'hero' of the piece)
UPDATE:
It seems to have been quite some time since I updated my project page. I haven't been lazy (honest) just busy working hard behind the scenes trying to organise my workload and determine what I need to do first.
I have created two more environment concept paintings. I think the overall colour scheme works and sets the right mood for the project.

Lots going on in this piece. Perhaps even a little too much going on. (click the image for larger version)

I think this is more like it. The road is a lot emptier than I think it should be, but you get the point.
(click the image for larger version)
I have also been out scouting for locations and I have been lucky enough to find the perfect spot thanks to the great people at the Port of Poole Authority. I've been granted access to film there and have even had a few of the staff ask if they could be zombies! I guess everyone is getting into the Halloween vibe right now.
I took my camera along to the meeting I had with the PPA and managed to put together a panoramic (I stitched 6 photographs together in Photoshop) of one of the locations I have access too. A great location that really suits my set extension requirements.

Wasteland at the Port of Poole Panoramic Image (click the image for larger version)
Recently I have also been getting to grips with PFTrack. I will be using this tracking software in collaboration with Nuke for some of the more tricky tracking shots. I will post more about this soon.
UPDATE:
I started work on an environment matte painting tonight based on one of the photo's I took last week when scouting for a location. It's still a very early work in progress, but it's helping me make a few decisions about composition of shots and style for the project. Having a real location to work with, rather than designing from my mind, is great as it means I can (kind of) see how it could look. This is what I have so far after a few hours painting, erasing and merging:

Click the image for a larger view.
UPDATE:
I have created a (very rough) storyboard to help get the idea across for my revised version of the project. This is basically something that I can show my lecturers to help visualise it a bit clearer. Still early days as far as I am concerned regarding the camera work. I will be heading out to the location for a pre-shoot visit next week which should give me more of an understanding as to what I have to play with on site:
UPDATE:
Hello there. What can I say? It's been a long time since I posted anything on this project (it's now less than two week until Christmas) and the production has been slow to say the least.
The main culprit has been the weather. It has not stopped raining for, well, it feels like forever. This really scuppered my filming plans along with a weeks worth of filming dates I had to reschedule at the last moment for reasons beyond my control.
However, with that said, I did finally manage to get out last week and finally film my first draft version of the project. With the help of two classmates, we went down to the harbour to film. Spent an hour before this doing my actors SFX make-up and the weather was looking good.
Unfortunately when we arrived, the green screen frame was damaged which meant the only option we had was to do a bit of D.I.Y. with some stones and a concrete wall. The screen was so creased that I though the day was going to be a wash out. Then, out of nowhere, Arctic winds hit us which made the screen move as well as being creased. The gods of film making were not smiling on us this day.
The main thing is that I got some practice with the camera set up I am using and it was all really valuable stuff. I have since been on two other films shoots (as an actor) with some of my class mates and I have taken those opportunities to discuss and share methods and techniques. During this time I have also been performing studies using the new Autodesk 123D Catch software. I think it is a great little toy for creating quick projection onto scanned geometry which is produced from your photo's, but the end results are not efficient or clean enough to use in production (well, not with the time limit I have at this point anyway).
I have also been out texture hunting with my camera and have collected a vast number of useful photo's that I will certainly be using in my project. I have also shot a lot of pictures of high rise buildings and various other pieces of architecture to use for projection work with Nuke. I shall be adding to this over the Christmas period with a trip back home to London where I hope to take some city shots.
Well, that's about all for now, not a big update, but looking forward to filming my full footage in the beginning of January 2012. Below you will find a few production diary shots and low quality compositing tests from the last few weeks.
Happy Christmas and a Peaceful New Year!


UPDATE (THURSDAY 12/01/2012):
Christmas has come and gone and we're now well into the first few weeks of 2012 (an appropriate year for an apocalyptic themed project).
I spent some time over the holiday period reviewing my designs for the look and location of the project. I was not happy with the composition of the 'Freeway' scene. The overpass idea was working as it gave a strong framing reference for our hero, but the problem I was having was coming up with an answer for the question 'what do I place along the side of the road that wouldn't be distracting and yet still looked right'?
I toyed with a couple of ideas. Firstly (as seen in my original concepts) I was going to create some dilapidated buildings to populate these areas. After careful consideration I decided this would make the image too 'busy' as having this along with the 'destroyed cars' would make the images on screen quite hard for the viewer to 'read' properly.
Naturally, this type of environment would more than likely have trees either side of the road. This again was a problem as the 'living trees' would, in my point of view, distract the viewer too as the theme is one of decay and destruction and therefore the trees would be too much of a contrast to work properly.
So, how did I rectify this problem? I decided to keeps the existing shots (as much as possible) and change the location. The action now takes place in an abandoned Subway Station. There are signs of life in the scene, for example there is a small scaffold tower against one of the platform pillars with scattered paint pots etc. I did this as it allowed me to place work site lamps in around the scene to light the environment without having to rely on overhead lights as usually found in this type of environment. This in turn gave me the ability to use these lamps to focus exactly where I wanted the light to illuminate and to also help create a chiaroscuro effect which would allow me to really make use of contrasting light and shadow.
I had planned to re-shoot my footage in early January (as the last shoot was a little bit of a nightmare mainly due to weather). The new environment means that I will be shooting in a green screen studio environment (which will be taking place on the 24th and 25th of January fingers crossed). Having this new environment means that I will no longer lose sleep over weather forecasts and I'll hopefully be able to produce a better standard of footage. I will also be using a SONY EX3 camera to capture the footage and, from what I have seen from this camera so far, the footage is stunning. It also means that I can light the subjects more precisely and match this in Maya/Nuke.
I had planned to re-shoot my footage in early January (as the last shoot was a little bit of a nightmare mainly due to weather). The new environment means that I will be shooting in a green screen studio environment (which will be taking place on the 24th and 25th of January fingers crossed). Having this new environment means that I will no longer lose sleep over weather forecasts and I'll hopefully be able to produce a better standard of footage. I will also be using a SONY EX3 camera to capture the footage and, from what I have seen from this camera so far, the footage is stunning. It also means that I can light the subjects more precisely and match this in Maya/Nuke.
Here are a couple of images of my work in progress with this new concept. I have also made a storyboard which I have edited together (ignore the timings on this video as it really is just a storyboard and not meant to be viewed as a complete animatic).

This is my 'mood board' for the Station environment.

Work in progress on the small commuter tunnel from shot #1

Blocking in the environment models

Base model for the Subway Train

Work in progress on the train colour textures

Another work in progress shot of the train
My revised storyboard. The shots where you see the train will also have zombies on the platform (I hope that makes sense!)
UPDATE:
I have finally shot my footage for the project, in one day!
After a number of hiccups, including double bookings of camera equipment and studio space, I managed to put together a great team of people to help me with moving lights, setting up the stage, operating the camera so I could concentrate on directing etc.
Because of the double booking fiasco I had to get all my actors in at late notice, create their make up, and film them over one very hectic day. Because of the number of students wishing to use the facilities at University and because I did not wish to monopolise all of my actors time (as they too are very busy students with their own projects to work on) I could not afford to reschedule. Hopefully, I have managed to acquire enough footage that is usable. At the moment the footage is being transferred from the Solid State Drive which was used with the SONY EX3 camera we shot on, so, fingers crossed it is all good.
The next stage will be to take the footage and clean it up and key it so that I can use it in the comp with the environment models I have been working on (although no work has taken place on these over the last week as I am working on other assignments at the same time).
Having a lot of problems with noise from the footage filmed with the SONY EX3. Not the only one to be suffering from this on my course. I really don't want to have to re-shoot anything.
Having a lot of problems with noise from the footage filmed with the SONY EX3. Not the only one to be suffering from this on my course. I really don't want to have to re-shoot anything.
Here are a few shots from the days shoot (including a rough slap comp which has a backplate that is not the backplate for the shot. Hence the reason the lighting does not match). Be warned, they are a bit gory lol.
Attila Drools on Dawids shoulder in this shot. I may have to leave this in the final production lol.
From left to right: Stephanie, Agatha and Jasper. A great bunch of people on my course that really threw themselves into the shoot. This is a de-noise test after I tweaked with the SONY EX3 footage in Nuke. A LOT better than it looked before Nuke. Not sure how I am going to key it though. Probably with a lot of coffee and prayers.